Software Installations
Chapter 1
LabVIEW Installation Procedure
Table of Contents
1.1 Offline installation
1.2 Online installation
1.1 LabVIEW - Offline installation
- Right click on the LabVIEW Installation image file and select Open with > Windows Explorer.

- Left click the install.exe file to start the installation.

- Accept the NI license agreements and click Next button.

- Add tick mark to the Disable Windows Fast startup checkbox and click the Next button

- Review the NI Package manager installation list and click Next button

- It will install the NI package manager

- Select the required list of tools and click the Next button.

- Select the required additional tools and click the Next button.

- Accept the NI license agreement and click the Next button.

- Accept the Microsoft license agreement and click the Next button.

- Add tick mark to the Disable Windows Fast startup checkbox and click the Next button

- Review the NI tools installation list and click Next button

- It will install the selected NI tools.

- Select No to disable the automatic updates

- Select No for disabling the NI Customer Experience Improvement Program.

- Click the finish button to complete the installation & restart the PC.
- Open the LabVIEW Software from start menu. Click the Begin 7 day trail to start the LabVIEW Software in trail mode.

1.2 Installing cDAQ USB Chassis
We required the following items to use the cDAQ USB Chassis with modules
- Power Adapter (for cDAQ 9174, cDAQ 9178 and cDAQ 9179 Chassis)
- Locking USB Cable
- Screwdriver
- PC running Windows OS
- Application Software (LabVIEW or DAQExpress)
- NI-DAQmx driver
- c Series modules
The cDAQ Chassis installation is given below.
- Install the application software, as described in the installation instruction that accompany the software.
- Install NI-DAQmx Driver software.
cDAQ Chassis NI-DAQmx Version support cDAQ 9171 NI-DAQmx 9.4 and later cDAQ 9174 NI-DAQmx 9.0.2 and later cDAQ 9178 NI-DAQmx 9.0.2 and later cDAQ 9179 NI-DAQmx 15.1 and later - Make sure that no signals are connected to the c-series modules.
- Align the c-Series module with the cDAQ Chassis slot.
- Squeeze both c-series module latches, insert the module in the slot, and press until both latches lock the module in place.
- Connect the cDAQ Chsasis with the USB Cable to PC. Use the jackscrew to securely attach the USB Cable to the cDAQ Chassis.
- Connect the power adapter to the cDAQ Chassis and plugpoint to the power socket. (Only for cDAQ-9174 / 9178 / 9179). Make sure that it meets the specifications listed in the datasheet of the chassis. Turn-on the power supply to the Chassis.
- Open NI MAX (Measurement & Automation Explorer)
- Expand My System > Devices and Interfaces to verify that cDAQ Chassis is lsited there. If the Chassis does not appear, press F5 or Select View > Refresh to refresh the view in NI MAX.
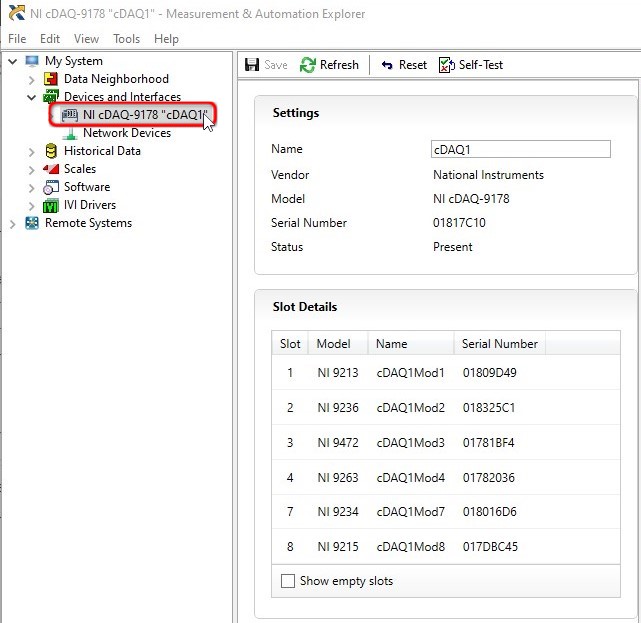
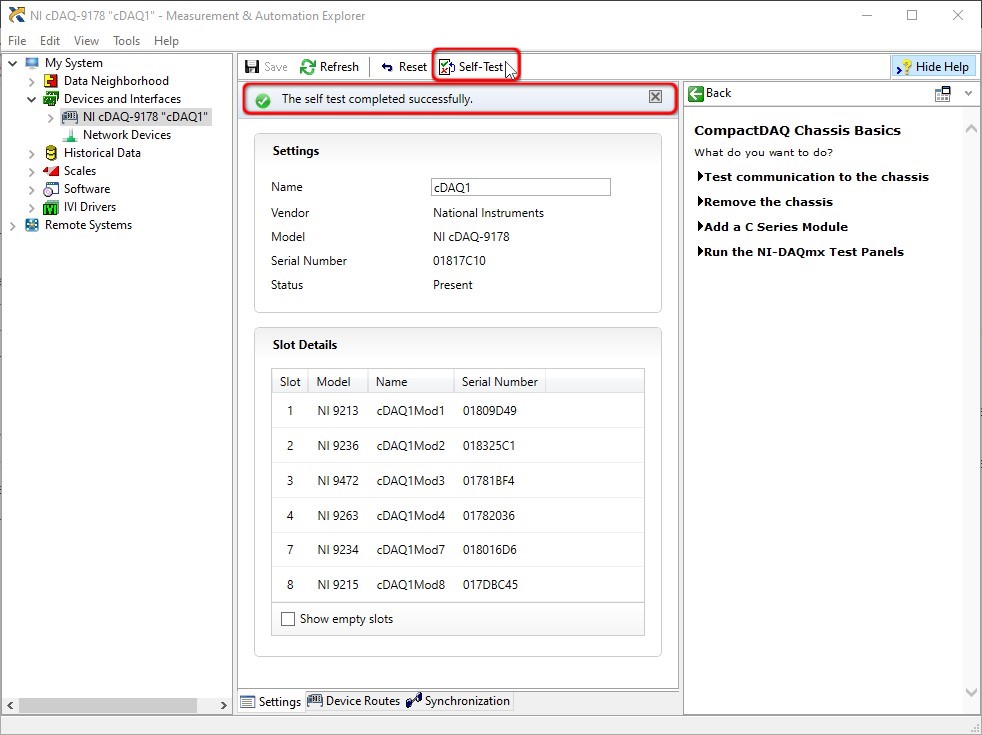
- Select the Chassis and select the Self-Test in the rightside panel. Self-test performs a brief test to determine successful chassis installation. When the self-test finishes, a message indicates successful verification or if an error occurred. If an error occurs, please contact our support team at support@innovativeinvaders.com
When in use, the cDAQ chassis may become warm to the touch. This is normal.
